Chapter 3. Your function as a web API
- Introducing the Amazon API Gateway
- Exposing functions as web APIs
- Customizing the integration between web API and function
- Testing the web API from the web console, a browser, or the command line
- Using the API Gateway context in a function
configure the function, edited the code, and quickly tested the function from the web console
function available over HTTP as a web API using the Amazon API Gateway
integrate a Lambda function with the API Gateway
HTTP
HTTP
HTTP means HyperText Transfer Protocol. HTTP is the underlying protocol used by the World Wide Web and this protocol defines how messages are formatted and transmitted, and what actions Web servers and browsers should take in response to various commands.
For example, when you enter a URL in your browser, this actually sends an HTTP command to the Web server directing it to fetch and transmit the requested Web page. The other main standard that controls how the World Wide Web works is HTML, which covers how Web pages are formatted and displayed.
URL A Uniform Resource Locator (URL), colloquially termed a web address is a reference to a web resource that specifies its location on a computer network and a mechanism for retrieving it.
3.1. Introducing the Amazon API Gateway
you can use functions via a web API that you design.
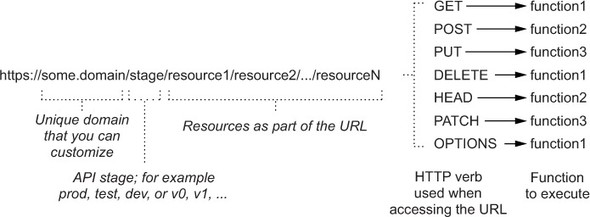
Web APIs use a URL to identify an endpoint (for example, https://my.webapi.com) and HTTP
verbs (or methods, such as GET, POST, PUT, and DELETE) to interact with the endpoint.
verbs (or methods, such as GET, POST, PUT, and DELETE) to interact with the endpoint.
map web APIs to back end functions that can be implemented using AWS Lambda or an
internet-available HTTP invocation
internet-available HTTP invocation
Lambda functions for the back end
build an API that can have different stages. A stage defines the path (between the domain
and the resources)
and the resources)
Each stage maps the access to URL endpoints, specified as resources, with an HTTP verb
(such as GET, POST, PUT, or DELETE) to methods.
(such as GET, POST, PUT, or DELETE) to methods.
provide a serverless back end that’s simpler to manage and scale than a traditional web server
architecture (figure 3.1).
architecture (figure 3.1).

3.2. Creating the API
build a basic web API to invoke our greetingsOnDemand


generic utility API that you can use and extend with different features over time. Type “My Utilities”
as the API name, and leave the default option to not clone them from an existing API selected
as the API name, and leave the default option to not clone them from an existing API selected

WHAT IS A REST API?
REST (Representational State Transfer) is truly a “web services” API. REST APIs are
based on URIs (Uniform Resource Identifier, of which a URL is a specific type) and the
HTTP protocol, and use JSON for a data format, which is super browser-compatible.
(It could also theoretically use the SOAP protocol, as we mentioned above.) REST APIs
can be simple to build and scale, but they can also be massive and complicated—it’s all
in how they’re built, added on to, and what they’re designed to do.
WebSocket is a computer communications protocol, providing full-duplex communication channels over
a single TCP connection. The WebSocket protocol was standardized by the IETF as RFC 6455 in 2011,
and the WebSocket API in Web IDL is being standardized by the W3C.
a single TCP connection. The WebSocket protocol was standardized by the IETF as RFC 6455 in 2011,
and the WebSocket API in Web IDL is being standardized by the W3C.
WebSocket is a different protocol from HTTP. Both protocols are located at layer 7 in the OSI model and,
as such, depend on TCP at layer 4. Although they are different, RFC 6455 states that WebSocket "is
designed to work over HTTP ports 80 and 443 as well as to support HTTP proxies and intermediaries"
thus making it compatible with the HTTP protocol. To achieve compatibility, the WebSocket handshake
uses the HTTP Upgrade header[1] to change from the HTTP protocol to the WebSocket protocol.
Each API has a custom endpoint (which you can personalize with a domain you own and the relative
SSL/TLS certificate)
SSL/TLS certificate)
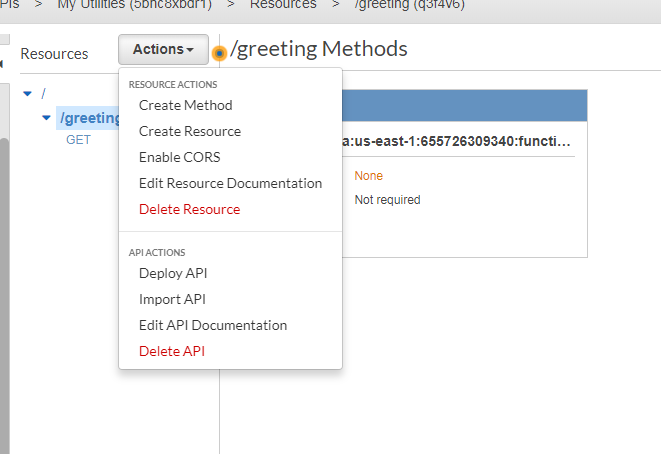
Leave the default resource (/) empty and create one for our /greeting by selecting Create Resource
from the Actions menu, and typing “Greeting” as the resource name. This automatically populates
the resource path as “greeting” (lowercase).
from the Actions menu, and typing “Greeting” as the resource name. This automatically populates
the resource path as “greeting” (lowercase).
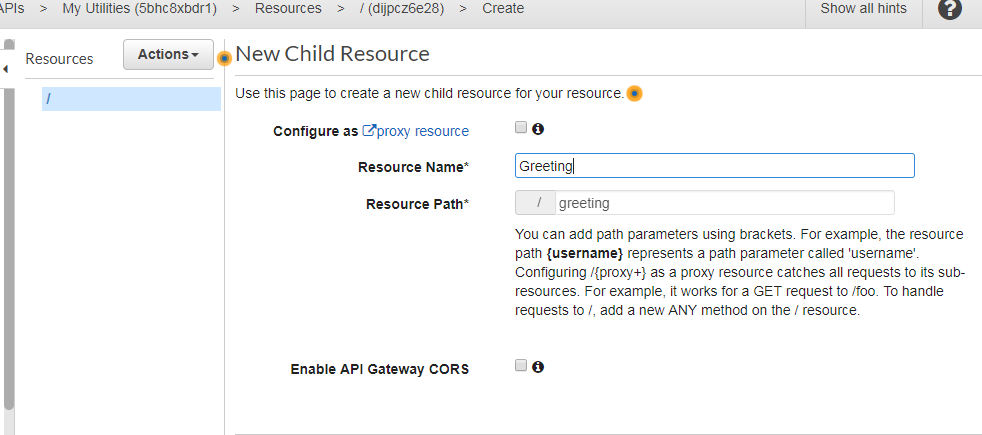
The /greeting resource appears on the left of the console, and you can now connect the resource
with a method. With /greeting selected, which should be the default after the creation of the
resource, choose Create Method from the Actions menu, and choose the HTTP verb GET from the list.
with a method. With /greeting selected, which should be the default after the creation of the
resource, choose Create Method from the Actions menu, and choose the HTTP verb GET from the list.
greetingsOnDemand
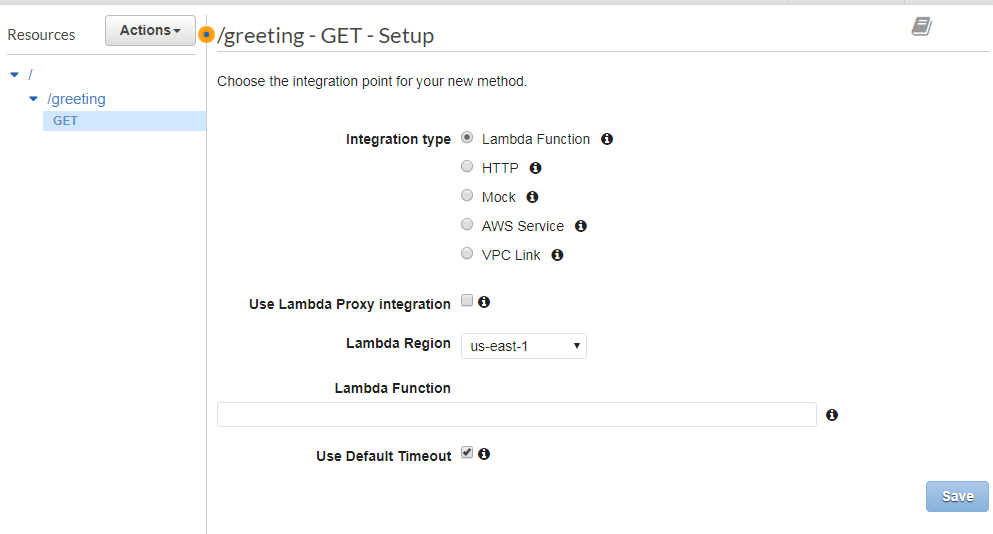
3.3. Creating the integration
The Amazon API Gateway can be integrated with different kinds of back ends, including legacy web services or mock implementations.

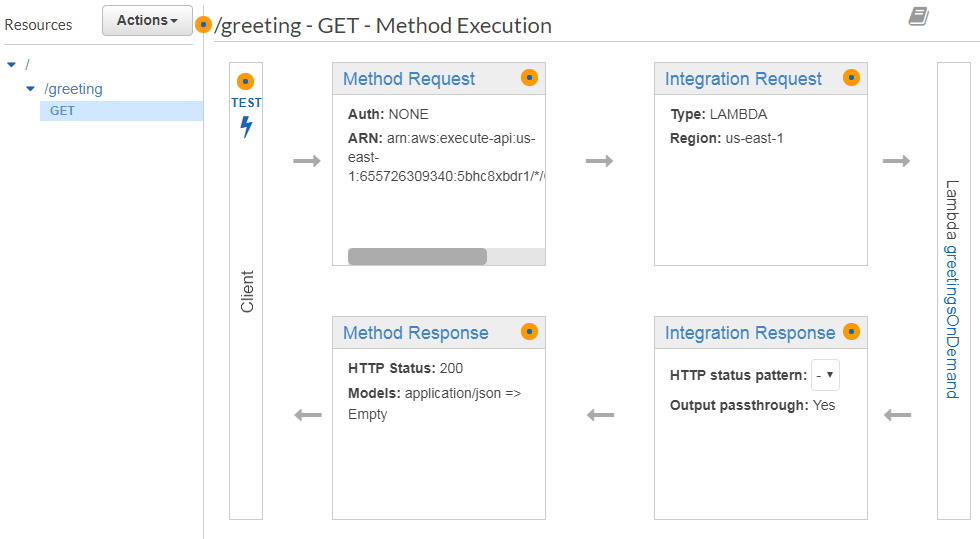
Starting from the left, following the execution flow of a request coming from a client, you have in
clockwise order:
clockwise order:
1. The client invoking the API. At the top there is a Test link to quickly test the integration from the
web console.
web console.
2. A Method Request section to select the parameters you want to receive as input.
3. An Integration Request section to map those parameters in the JSON format AWS Lambda expects
in input.
in input.
4. The back-end implementation, in this case using AWS Lambda with the greetingsOnDemand
function.
function.
5. An Integration Response section to extract and map the response of the AWS Lambda to different
HTTP return statuses (for instance, 200 OK) and formats (“application/json” is one of them,
but probably the most common). Here you can also manage errors returned by the function to map
them to HTTP error codes (for example, should the error returned by the function be mapped to a
4xx or a 5xx HTTP error?).
6. A Method Response section to customize the HTTP response, including HTTP headers.
use a name parameter, so select Method Request and then expand the URL Query String Parameters
section. Add “name” as a query string.
section. Add “name” as a query string.

put the name parameter in JSON syntax
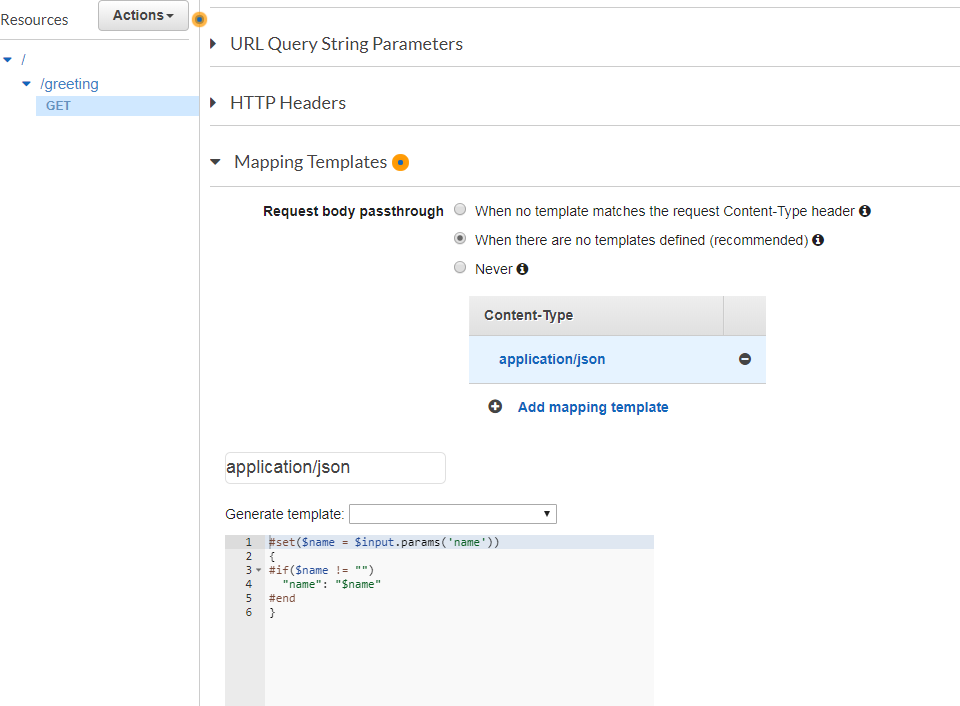
Select Integration Request and expand the Body Mapping Templates section to add a mapping template.

Set the “Request body passthrough” to the recommended option
JSON Schema is a way to describe your JSON data format. For more information,
please see http://json-schema.org.
please see http://json-schema.org.

This will build a JSON object with the name key equal to the content of the name parameter you just
configured. The $input variable is part of a set that you can use in templates and models too.
{ "name": "$input.params('name')" }
configured. The $input variable is part of a set that you can use in templates and models too.
{ "name": "$input.params('name')" }
3.4. Testing the integration
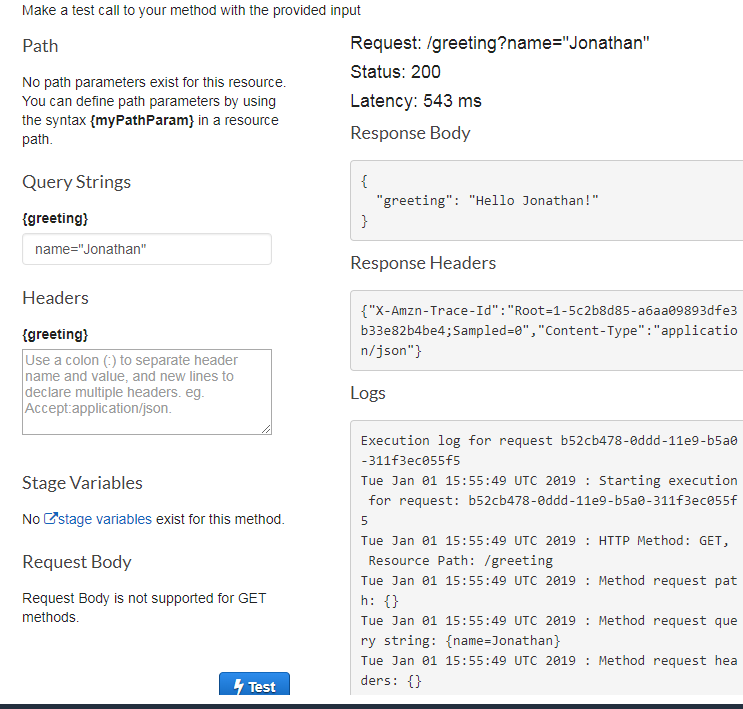
Hit Test
You can now specify a value for the name parameter; use “John” or another name, if you prefer.
Click the Test button
Click the Test button

you have “application/json” as the Content-Type in the Response Headers section (expand that section
in the web console to check), but a string (that is, “Hello John!”) as the response body, which isn’t a
valid JSON output.
in the web console to check), but a string (that is, “Hello John!”) as the response body, which isn’t a
valid JSON output.
In query string put name=”John”

you have “application/json” as the Content-Type in the Response Headers section (expand that section
in the web console to check), but a string (that is, “Hello John!”) as the response body, which isn’t a
valid JSON output.
in the web console to check), but a string (that is, “Hello John!”) as the response body, which isn’t a
valid JSON output.
3.5. Transforming the response
not doing any transformation on the response, as you can see by expanding the Logs section in the
result of the test
result of the test
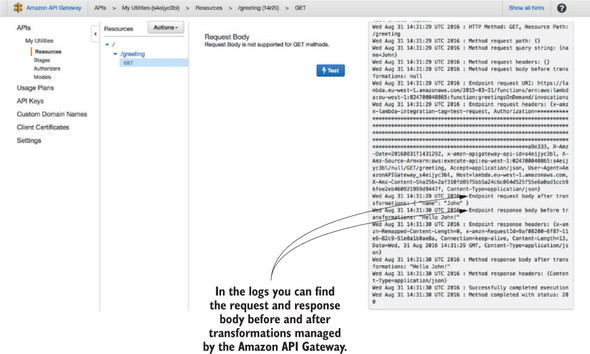
Method Execution at the top and selecting Integration Response.
expand Body Mapping Templates. Select “application/json” and change “Output passthrough”
to be a JSON output, using the following mapping template in a way similar to what you did
previously for the “Input passthrough” option:
to be a JSON output, using the following mapping template in a way similar to what you did
previously for the “Input passthrough” option:
{ "greeting": "$input.path('$')" }

The $ in the $input.path represents the overall response received by the API Gateway, which is put
in as the value of the greeting key.
in as the value of the greeting key.
Save and go back to Method Execution again to run another test, using your favorite “name”
in the query
strings. Click the Test button to actually run a new test and overwrite the result. Now the response
body has a fully compliant JSON syntax.
in the query
strings. Click the Test button to actually run a new test and overwrite the result. Now the response
body has a fully compliant JSON syntax.
change the default behavior for our REST API, go back to Method Execution and select Integration
Request
Request
Change the mapping template to include the name key only if the name parameter isn’t empty using
an #if ... #end block. To make the template easier to read and avoid repetitions, use #set to set
the variable $name to the value of the name input parameter:
an #if ... #end block. To make the template easier to read and avoid repetitions, use #set to set
the variable $name to the value of the name input parameter:
#set($name = $input.params('name'))
{
#if($name != "")
"name": "$name"
#end
}


Test the API in a browser. It’s relatively simple, because you’re using the GET HTTP verb that’s the
default used by browsers.
default used by browsers.
Choose the HTTP verb GET from the list below the /greeting resource (figure 3.12). You can
change method-specific settings, but for now, leave the default settings inherited from the stage.
change method-specific settings, but for now, leave the default settings inherited from the stage.

Copy the Invoke URL at the top of the page. You can click the Invoke URL link, but that will change
the content of the current browser tab. It’s better if you open a new tab in the browser and paste the
invoke URL you copied into the address bar
the content of the current browser tab. It’s better if you open a new tab in the browser and paste the
invoke URL you copied into the address bar

Add “?name=John” at the end of the previous URL to specify a name as a query parameter. Be careful
if you want to use different names; certain characters may require URL encoding, so use basic
single-word names for now. You should get a “Hello John!” in the response JSON payload.
if you want to use different names; certain characters may require URL encoding, so use basic
single-word names for now. You should get a “Hello John!” in the response JSON payload.

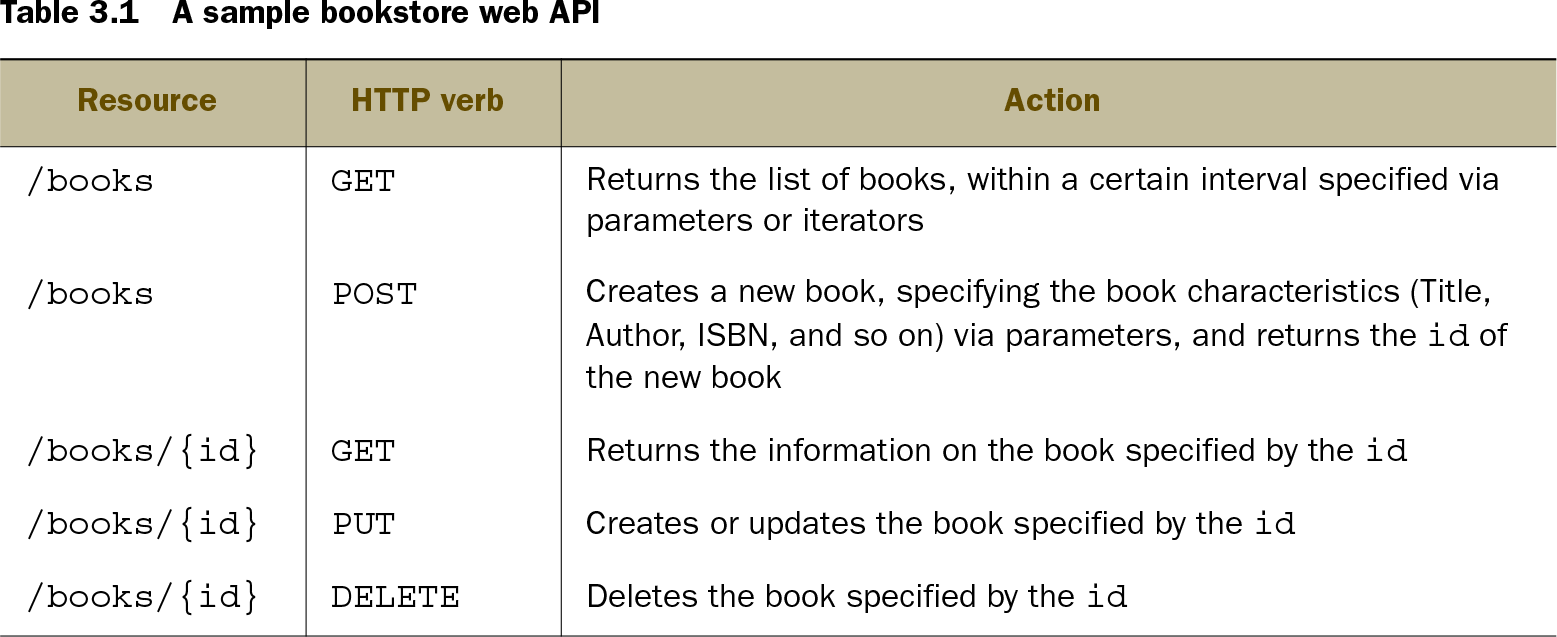
3.6. Using resource paths as parameters
Our /greeting API method uses query parameters to pass the name to greet, with a syntax such
as “/greetings?name=John”
as “/greetings?name=John”
replace the generic first name you used before with a unique identifier;
API Gateway you can configure a resource path as a variable parameter that can be used by the
method execution.
method execution.
Select Resources from the left. Starting from / (which must be selected),
create a new “User” resource (leave the default “user” value in the resource path)
/user selected create a new depending resource using “Username” as the resource name and
“{username}” as the resource path.
“{username}” as the resource path.
Because the resource path is enclosed by curly brackets, it’s interpreted by the API Gateway as
a parameter.
a parameter.
keeping the “Username” resource selected, create a “Greet” resource (leave the default “greet”
value in the resource path)
value in the resource path)


you have to map the usernameparameter of the API Gateway to the name key in the event of the
function. In the previous method, both parameters were called name, but now they’re different.
To do that, change the mapping template for the integration request to be
function. In the previous method, both parameters were called name, but now they’re different.
To do that, change the mapping template for the integration request to be


3.7. Using the API Gateway context
integrate a Lambda function with the context provided by the API Gateway
the $context.identity.sourceIp variable contains the IP address of the API caller.
1. Pass the value of this variable from the Amazon API Gateway to an AWS Lambda function in the
back end.
back end.
2. Implement a basic Lambda function that gets this value in input and sends back the same
value in output as the result.
value in output as the result.
start with the Lambda function. Create a new function called whatIsMyIp
exports.handler = (event, context, callback) => {
callback(null, event.myip);
};
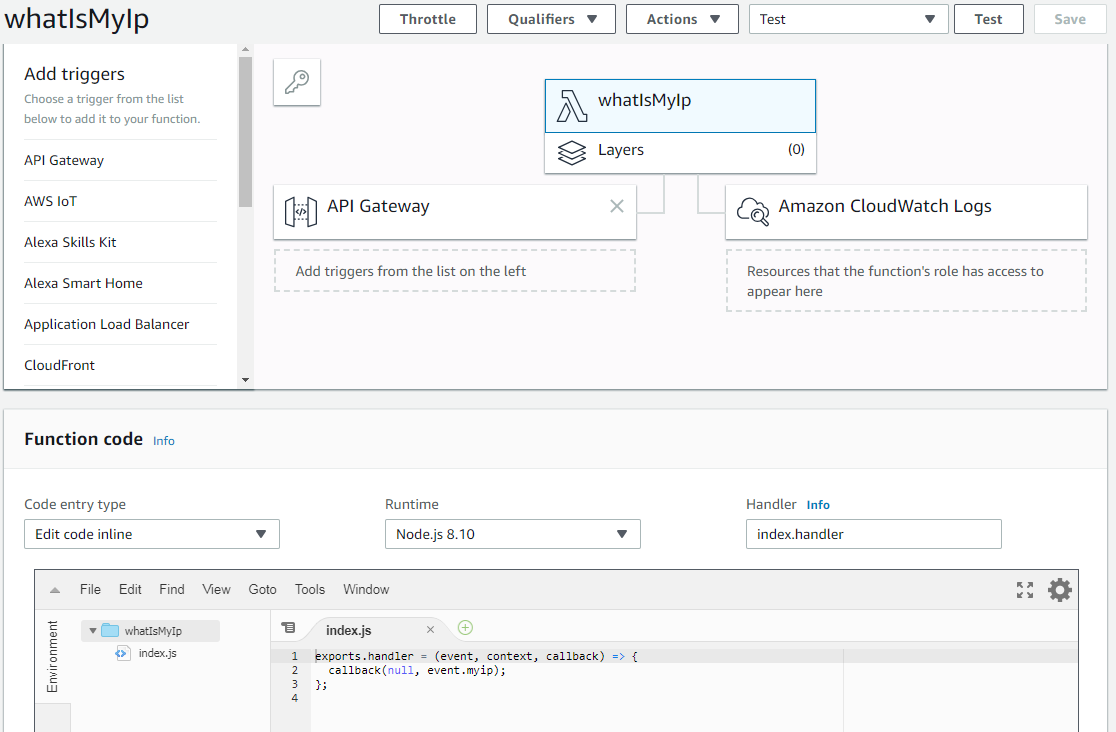
test the function before the API Gateway integration
{
"myip": "1.1.1.1"
}
/my-ip selected, choose Create Method and select GET
extract the source IP address from the context of the API Gateway and put that into the
JSON payload used to invoke the function.
JSON payload used to invoke the function.
{
"myip": "$context.identity.sourceIp"
}

No comments:
Post a Comment